Using Blackmagic DaVinci Resolve Studio for DCP creation
DaVinci Resolve Studio ($295) has a built-in Kakadu JPEG 2000 encoder that can export standard, unencrypted DCPs directly from the timeline. Since Resolve is made for color grading and video editing in the first place, it is a natural choice when the film is already being finished there: you grade, you check the loudness, and you export the DCP from the same project. Resolve can also read DCPs back in, which makes it easy to quality check the result. The free version of Resolve also makes DCPs, but it applies a watermark, so for real deliveries you need the Studio version.
The Kakadu encoder has two limitations to be aware of. It cannot make encrypted DCPs, and it does not support DCP subtitles — subtitles must either be burned into the picture or added afterwards in another tool. If you need encryption, the easyDCP plugin (€949) KDM generation, from inside Resolve. The Easydcp plugin used to support XML subtitles in version 17.2 but it does not work anymore.
Beyond the encoder itself, Resolve brings a lot to DCP work: it can burn in subtitles and titles, it has very good deinterlacing and scaling for older video material that needs to come up to 2K or 4K, it has built-in loudness metering and normalization, and it supports third-party audio plugins for stereo-to-5.1 upmixing.
I have also written tutorials on how to make DCPs for free in DCP-o-Matic and advanced DCPs in Fraunhofer easyDCP Creator Plus.
Avoiding common pitfalls
Most DCP problems I see come from the same handful of mistakes, and they are all avoidable. Keep the original aspect ratio instead of cropping the picture to fill the container, so the intended framing survives. Keep the original frame rate — frame rate conversions that discard or duplicate frames are visible in every camera move. Match the timeline color space to what the source material actually is, not what you assume it is. Deliver 5.1 sound rather than a stereo-only DCP for theatrical release. Use the standard Flat (1.85:1) or Scope (2.39:1) containers and avoid the Full container, which is not standard for distribution. Name the DCP with the ISDCF naming convention, because that name is what the cinema’s ingest system and automation will show. And if you burn in subtitles, keep them at safe margins from the frame edges with sensible font sizes. Each of these comes up again below in the walkthrough.
How to make a DCP in Resolve
Change the project setting to a Flat or Scope DCI resolution
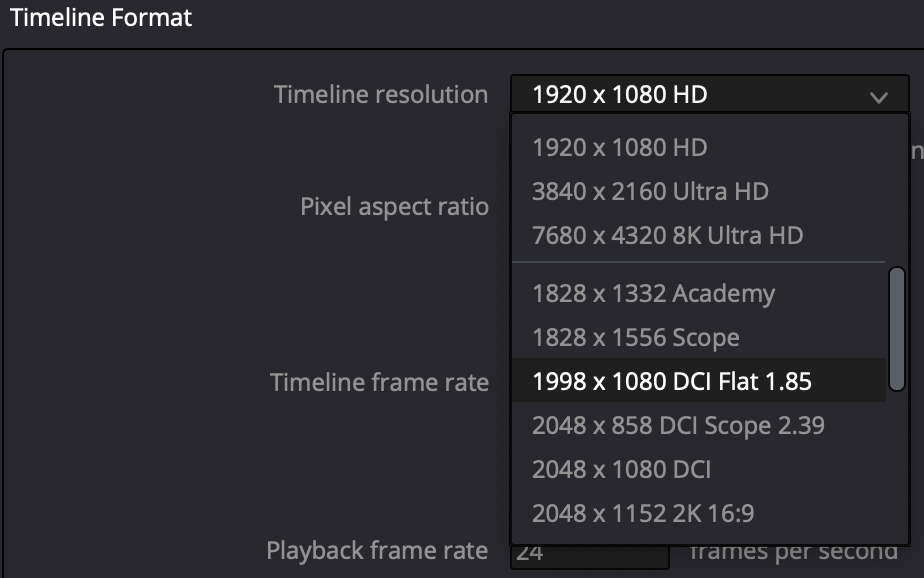
Start a new project and choose the DCI resolution in Timeline Format in the project settings that best matches the resolution and aspect ratio of the film:
- 2K DCI Flat 1.85 — 1998 x 1080
- 2K DCI Scope 2.39 — 2048 x 858
- 4K DCI Flat 1.85 — 3996 x 2160
- 4K DCI Scope 2.39 — 4096 x 1716
All modern digital cinemas play both Flat and Scope, and both 2K and 4K DCPs, so choose whichever fits the film. Avoid the DCI Full container formats (2048 x 1080 and 4096 x 2160) — they are not used for standard theatrical distribution.
Scale the video file to fit inside Flat or Scope
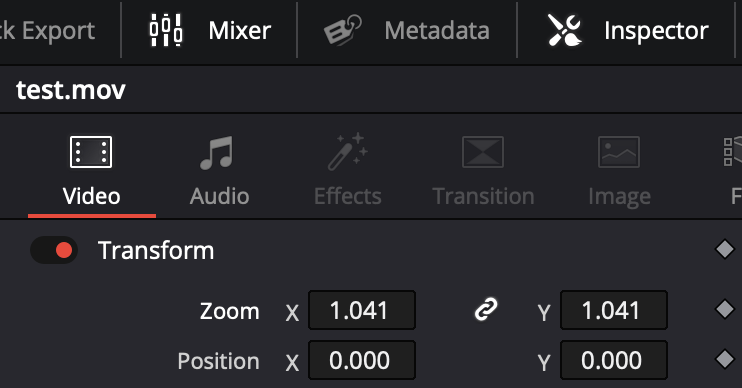
The standard practice is to scale the image to fit inside Flat or Scope while keeping the original aspect ratio. This often needs a manual adjustment, especially when the source file is letterboxed. A film shot in 1.85 and delivered letterboxed inside a 1920×1080 file, for example, can be zoomed in to fill the 1998×1080 Flat container. Select the clip and adjust Inspector – Transform – Zoom until the active picture fills the frame.
In some cases a filmmaker chooses instead to crop the picture to fit Flat or Scope exactly. That is a creative decision, just make sure it is a decision, not an accident of the scaling.
DCP frame rate,
It is best to make the DCP in the original frame rate of the film. I choose the same project frame rate as the video file, for a 24 fps master, Project Settings – Timeline frame rate – 24 FPS.
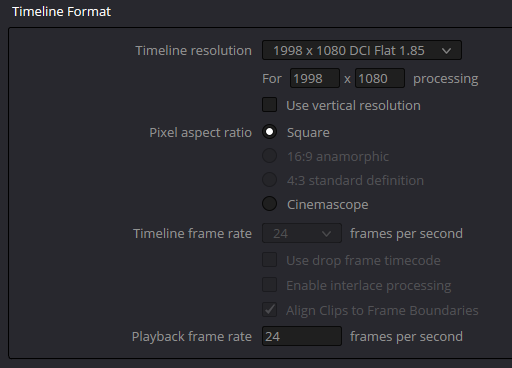
Be careful with mismatched rates: if you import a 23.98 fps video file into a 24 fps timeline, Resolve’s default handling of mixed frame rates will discard or duplicate frames to make it fit. Read more in my post on how to avoid frame rate conversions in Resolve.
DCP sound
5.1
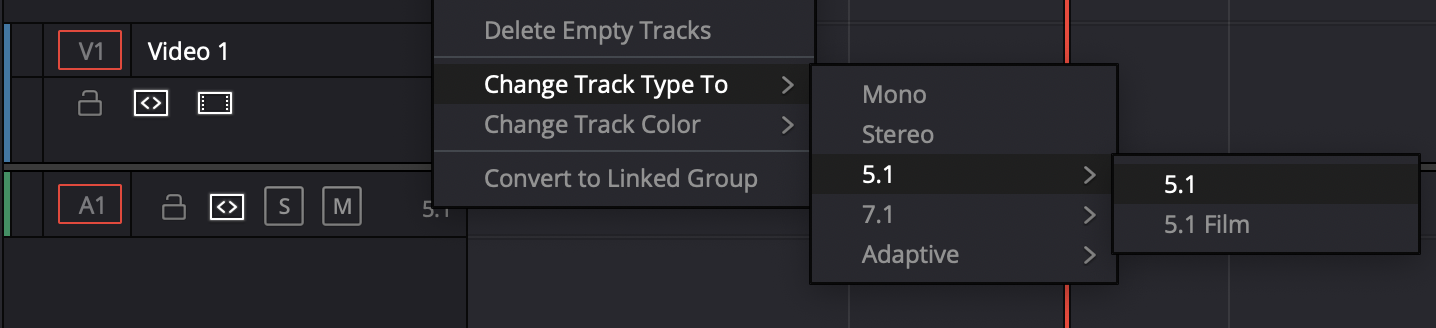
A standard DCP has 5.1 surround sound. In Resolve I put the mix on a dedicated 5.1 timeline track and export that track directly, rather than going through the main bus. Exporting the timeline track keeps the signal path clean: the six channels stay discrete, the channel mapping is preserved, and nothing on the bus or in the effects chain touches the mix on its way out.
Change the Audio Track Type to 5.1, not 5.1 Film.
When the 5.1 mix is delivered as six mono wave files, name them so Resolve recognizes the channels:
sound.L.wav
sound.R.wav
sound.C.wav
sound.LFE.wav
sound.Ls.wav
sound.Rs.wav
I select all six and drag them to the media pool together, and Resolve interprets them as one 5.1 audio file. Then I drag that to the 5.1 track. If the 5.1 mix comes embedded in a QuickTime or MXF video file instead, read this post on adding 5.1 from interleaved, mono and QT/MXF sources in Resolve.
Stereo or mono
When the film only has a stereo soundtrack, I typically upmix it to 5.1, which places the dialogue in the center channel, and add the upmixed version to the timeline. Read more about upmixing in Resolve.
With a mono soundtrack, the important thing is that the sound ends up in the center channel. You can run it through an upmixer — a stereo track that contains mono audio will automatically be directed to the center — or you can build a 5.1 track by hand: put the mono file in a file called sound.C.wav and add it together with silent tracks called sound.L.wav, sound.R.wav, sound.LFE.wav, sound.Ls.wav and sound.Rs.wav. Resolve then sees it as a 5.1 track with the mono sound in the center.
If you want to keep the stereo mix as stereo, add it to the 5.1 track. The left and right of the stereo mix are then carried on the left and right channels of the DCP.
7.1
To upgrade a 5.1 DCP to 7.1, the usual approach is a supplemental package rather than a new DCP. The base package carries the standard 5.1 on channels 1–6, and the supplemental 7.1 version adds Left rear surround on channel 11 and Right rear surround on channel 12. This keeps one set of picture files serving both 5.1 and 7.1 playback systems while preserving the original mix. More info in my post on making a 7.1 VF in easyDCP Creator Plus.
Check the loudness on the 5.1 track
Before exporting, check the loudness of the 5.1 track with Resolve’s built-in loudness meter or a plugin like Nugen VisLM. Read this post for more info on checking DCP loudness levels, and this one on how Netflix’s loudness level compares to a DCP feature film’s.
Resolve DCP Color Management
Matching the timeline color space to the source material is the single most important color decision in the whole export. Don’t just select P3 DCI White because it sounds cinema-like — check what the footage actually is. The file name often tells you (something like “Project_Rec709” or “Film_P3_DCI”), and video files are usually Rec.709 with 2.4 gamma. If you mismatch, for example P3 DCI White 2.6 gamma on Rec.709 2.4 footage, the DCP will have wrong colors and wrong gamma throughout.
REC 709 2.4 gamma to DCI X´Y´Z´
For standard video material in Rec.709 2.4 gamma, go to Project Settings – Color Management – Color Space and Transforms and set Color science to “DaVinci YRGB” and the Timeline color space to “Rec.709 Gamma 2.4”. Leave the Output color space as “Same as timeline”, the Output setting does not affect DCP creation, and don’t use the Color Space tag in the render pane for this either.

With Rec.709 Gamma 2.4 as the timeline color space, Resolve converts the film from Rec.709 2.4 to DCI X’Y’Z’ when the DCP is made. The image will look strange on a standard monitor while rendering, that is the X’Y’Z’ data being displayed without a transform, and it is normal. When you later drop the finished DCP back into a Rec.709 2.4 project, Resolve applies the reverse X’Y’Z’-to-Rec.709-2.4 transform automatically and it looks correct again.
DCI X’Y’Z’ as the timeline color space
If the content is already in DCI X’Y’Z’, or you are doing the conversion yourself with a 3D LUT or an effect, choose DCI X’Y’Z’ as the timeline color space instead. This switches Resolve’s automatic transform off, so your own conversion isn’t transformed a second time. Read more on the different methods to do the color transforms.
Export DCP settings
Format DCP Kakadu JPEG2000
On the Deliver page, choose Format: DCP and Codec: Kakadu JPEG 2000. Set Type to match the project — a 2K DCI Flat project gets Type 2K DCI Flat. The same goes for 2K DCI Scope, 4K DCI Flat and 4K DCI Scope; avoid the plain “2K DCI” and “4K DCI” Full-container types. Resolution and frame rate should also match the project settings.
Interop packaging unchecked
24 fps Interop is the older DCP standard. Leave “Use Interop packaging” unchecked and the DCP is made in the newer SMPTE standard — which is also the only option if the frame rate is anything other than 24.
Bit rate and quality: 240 Mbit/s and Qstep 0.00390
The maximum bit rate is 250 Mbit/s and the minimum is 50 Mbit/s. You can lower the maximum a little, 240 Mbit/s is often used, but the setting that actually matters for file size is the Quality mode next to it.
When Quality is set to Automatic, every image is encoded at the maximum bit rate, constant bit rate, even if the image is blank. The whole file is padded up to the cap regardless of how simple the content is; on a controlled test, Automatic put every single frame within a few hundred bytes of the ~1.3 MB per-frame DCI ceiling. CBR encoding is often not allowed.
To get variable bit rate (VBR) instead, set Quality to Qfactor or Qstep. Kakadu then encodes each frame at constant visual quality, spending only the bytes the frame needs, while the maximum bit rate still caps the complex ones. In my testing, a Qfactor of 99 gives a good variable bit rate with low file sizes, but it is the resolve default of Qstep 0.00390 that is most most often used to get good VBR results. 0.00195 is sometimes also used and gives better quality.
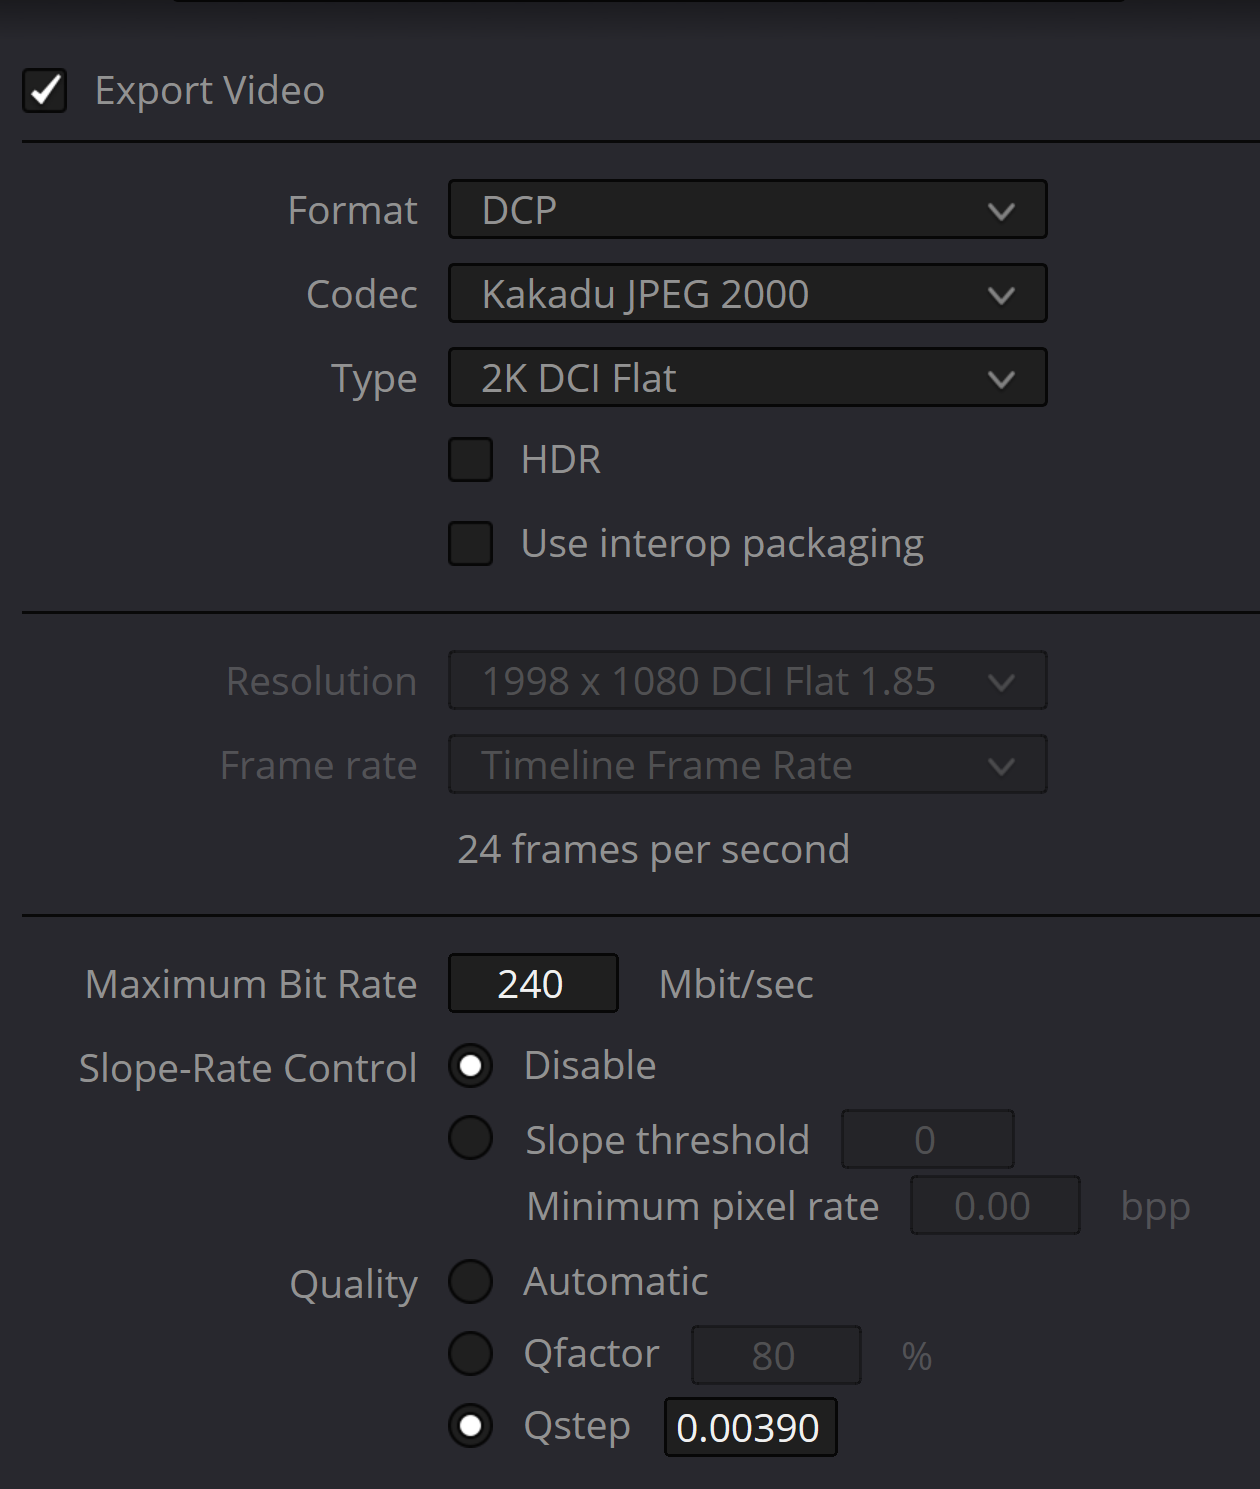
Note: On grainy 2K and 4K material the bit rate will sit at the maximum on any encoder, so don’t expect savings there.
Audio
Choose Configuration label: Wild track format, and Output Track: Timeline track, track number 1 — the 5.1 track we prepared earlier.
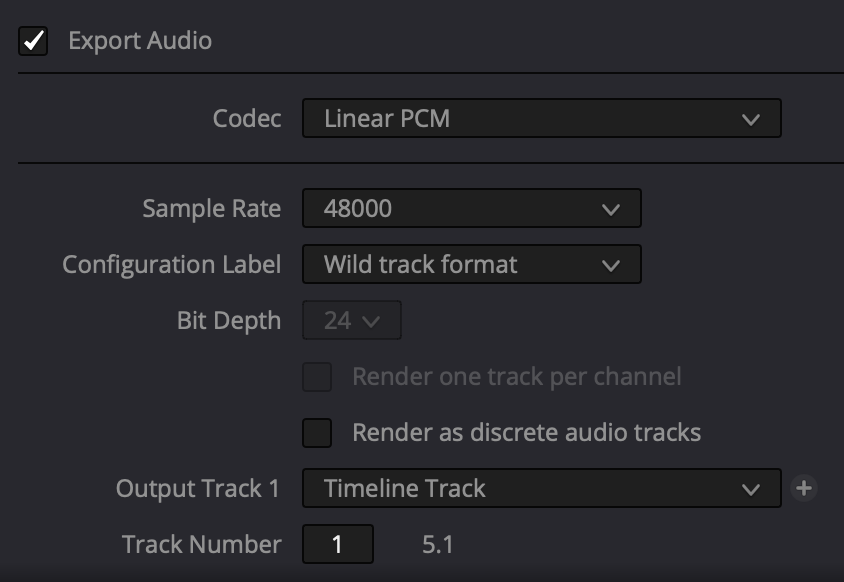
Note: Wild track format is the required audio configuration label for SMPTE DCPs.
Composition settings
Give the composition an ISDCF-compliant name, for example:
MovieTitle_FTR_F_EN-XX_INT-TL_51_2K_NULL_20220612_NUL_SMPTE_OV
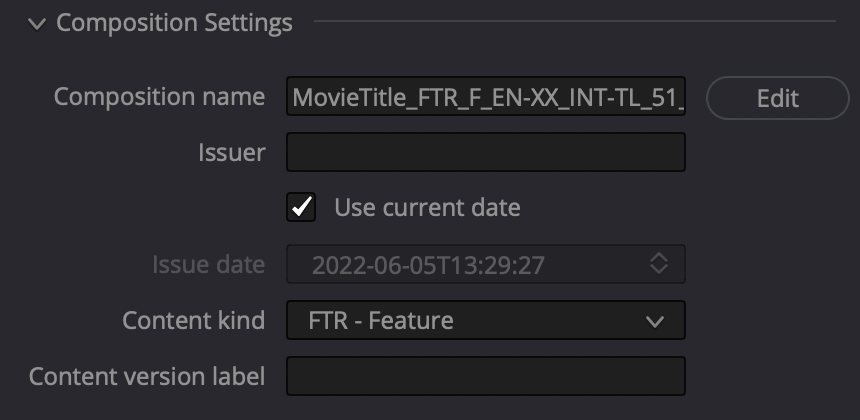
Reading the example from left to right: FTR is a Feature, F is the Flat container, EN-XX is English audio with no subtitles, INT-TL is international textless (often used in the territory/rating position), 51 is 5.1 audio, 2K is the resolution, and 20220612 is the date. Do not use spaces in the composition name — some cinema servers will refuse to play it — and make sure the Content Kind field matches the name (FTR means Content Kind should be Feature). Resolve has a built-in ISDCF name generator in the Edit menu that helps get the fields right. For the full story on DCP naming, see my guide on making a DCNC DCP name.
Subtitles
The Kakadu encoder does not support SMPTE or Interop XML subtitles, so a subtitled version needs one of two routes.
The first is soft subtitles added outside Resolve: build the DCP without subtitles and add them as a supplemental package in DCP-o-matic — see my guide on making a subtitle VF in DCP-o-Matic — or use easyDCP Creator, which I cover in my e-book.
The second is burning the subtitles into the picture. Add an SRT file to the timeline, and in the export settings enable “Export Subtitle” with Format set to “Burn into video”. Keep the subtitles at least 8% away from the frame edges, use standard DCP font sizes, and follow the usual DCP subtitle conventions for placement and readability. For detailed instructions, including italics, see my guide on burning in SRT subtitles in Resolve.
Testing your DCP
The quickest quality check is to import the finished DCP into a Rec.709 2.4 gamma project in Resolve, place it on the timeline above the original footage, and compare: check that audio and video are in sync and that the image quality holds up. Match the timeline color space to the original footage, if you use Rec.709 Scene instead of 2.4 gamma, the DCP will play back dark.
Resolve cannot display soft subtitles, so a subtitled DCP should also be checked in easyDCP Player or DCP-o-matic Player.
If the DCP looks greenish on playback, that is usually the DCI White chromatic adaptation — apply a chromatic adaptation effect from DCI White to D65. Detailed instructions in my post on fixing greenish DCPs in Resolve.
When you export an H.264 or ProRes review file from the DCP, use the Rec.709-A gamma tag to prevent the QuickTime Player gamma shift. Read more in this guide on avoiding gamma shift in Resolve.
Delivering the DCP
Most festivals and cinemas today provide their own upload link — follow the venue’s instructions and verify that the transfer completed. For professional digital delivery there are services like Aspera and Signiant; keep the download link valid long enough for the recipient, and keep a record of the delivery.
For physical delivery, the classic requirement is a hard drive formatted MBR ext3, properly labeled and documented, read more in my post on best practices for delivering a DCP on hard drive.
Whichever route you take: confirm the delivery method with the recipient first, allow enough time for the transfer, include the DCP specifications and playback instructions, and keep a backup copy until playback is confirmed. For comprehensive delivery instructions and troubleshooting, see my complete DCP delivery guide.
Thank you for this extremely detailed and to-the-point tutorial. Worked perfectly for me.