A 2.20:1 film in a Flat-and-Scope world
Oppenheimer (2023) was shot for the 2.20:1 aspect ratio, and it was distributed as a DCP in two versions: F-220 and S-220. That is unusual — Christopher Nolan’s earlier 2.20:1 films Tenet (2020) and Dunkirk (2017), and Jordan Peele’s Nope (2022), were only available as F-220 — and it left many cinemas with a genuine question: which of the two should we book and play?
The reason there are two versions at all comes from how digital cinema handles aspect ratios. Every projection system in the world is set up to show exactly two formats: Flat at 1.85:1 and Scope at 2.39:1. A film in any other ratio must be packaged inside one of those two containers, and the DCP name tells you which, in the format container-ratio. F-220 is the 2.20:1 picture sitting inside the Flat container with small black bars above and below (letterboxed); S-220 is the same picture inside the Scope container with small black bars on the sides (pillarboxed).
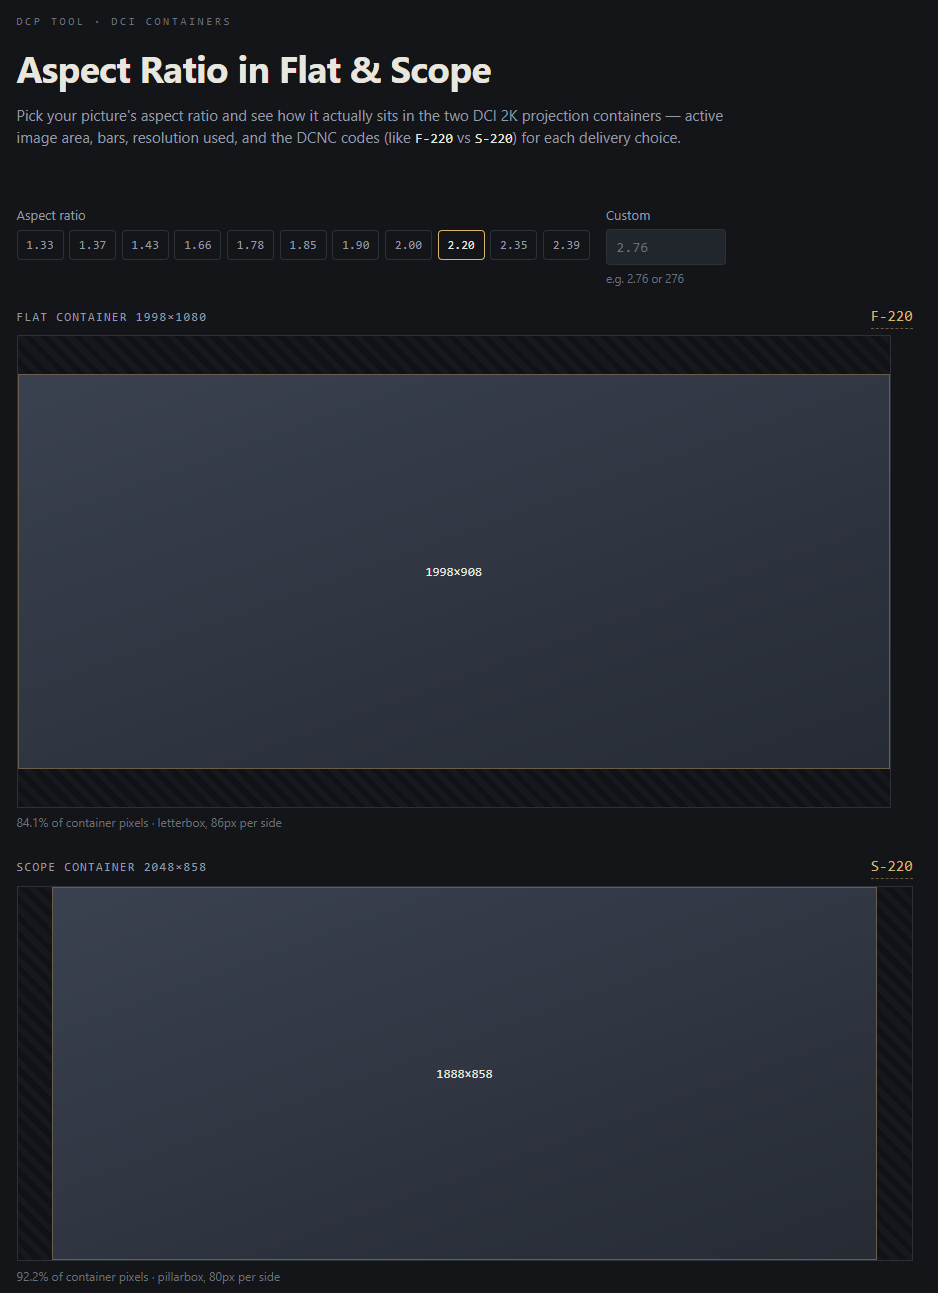
The two versions are not equivalent, and the difference is worth understanding before booking. In numbers: the Flat container is 1998 x 1080, so F-220 has an active picture of 1998 x 908 with 86-pixel bars top and bottom. The Scope container is 2048 x 858, so S-220 has an active picture of 1888 x 858 with 80-pixel bars on each side. F-220 therefore carries about 12% more picture resolution than S-220 — but resolution is not the whole story, because how large the picture ends up on the screen depends entirely on the shape of that screen.
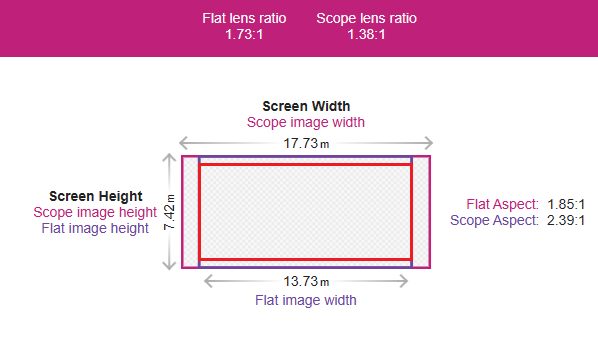
Fixed-height and fixed-width screens
Cinema screens come in two basic configurations, and this is what decides the F-220 versus S-220 question.
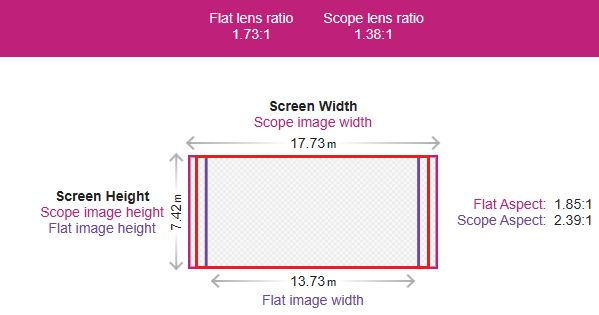
A fixed-height (constant-height) screen is built to the Scope ratio, about 2.39:1. Scope films fill the entire width of the screen, and narrower formats like Flat are shown with the side masking brought in. This is the modern standard for cinema auditoriums.
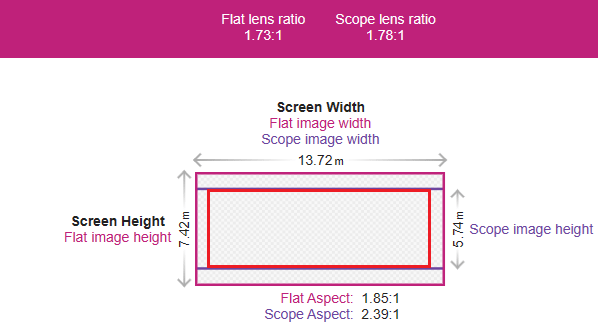
A fixed-width (constant-width) screen is built to the Flat ratio, 1.85:1. Flat films fill the entire screen, and Scope films are shown letterboxed, with the top and bottom masking brought in (or simply with black bars, where there is no masking).
So the short answer to the question in the title:
- Fixed-width screen: play the F-220 version with the standard Flat projector preset.
- Fixed-height screen: play the S-220 version — it gives the largest possible picture.
One more thing follows from this, and it explains the distribution pattern: an S-220 DCP must always be accompanied by an F-220 version, because S-220 does not present acceptably with the standard Scope preset in a fixed-width house. The same applies to other wider-than-Flat intermediate ratios like 2.00:1 and 1.90:1, which is why those are normally distributed only as F-200 and F-190. F-220 plays acceptably everywhere; S-220 is the optimized version for the theaters that can use it.
F-220 on a fixed-width screen
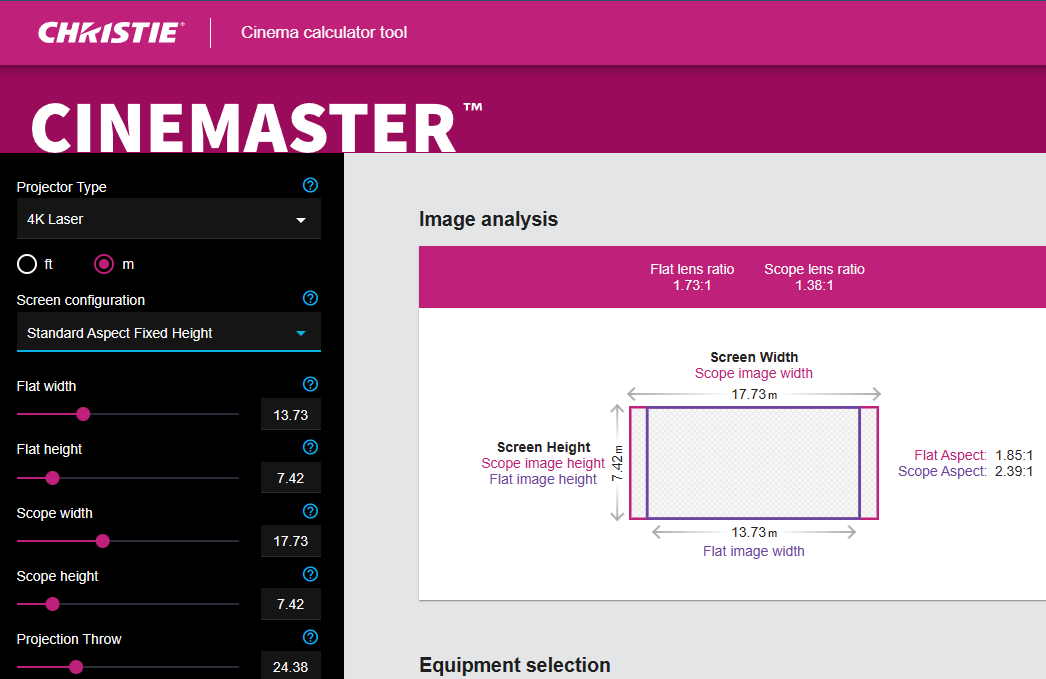
Screenshot from the Cinemaster (christiedigital.com) cinema calculator tool of a standard-aspect fixed-width screen:

On a fixed-width screen, select the F-220 version and project it with the ordinary Flat (1.85:1) preset. The image spans the full width of the screen, no side masking is needed, and the only trace of the packaging is a pair of small letterbox bars preserving the 2.20:1 ratio. Compare it with what the audience is used to seeing on that screen: a Flat film fills the screen completely, a Scope film shows large letterbox bars, and a 2.20:1 film as F-220 sits in between with minimal bars. This is exactly the presentation the format was designed for.

Do not book the S-220 version for a fixed-width screen. Played with the standard Scope preset, the Scope container is first letterboxed to fit the screen width, and the 2.20:1 picture then sits pillarboxed inside that — black bars on all four sides of an undersized image. The picture appears smaller than intended, a significant part of the screen goes unused, and the presentation loses brightness and impact. There is no preset that rescues this; the F-220 version exists precisely so that fixed-width houses never have to try.
S-220 on a fixed-height screen
Screenshot from the Cinemaster (christiedigital.com) cinema calculator tool of a standard-aspect fixed-height screen:
On a fixed-height screen the situation reverses, and S-220 is the version to choose. Scope films fill the entire width of these screens, and the 2.20:1 picture inside the Scope container comes very close: it uses the full height and about 92% of the Scope width, with only narrow pillarbox bars at the sides. That is the largest, most immersive presentation of the film the auditorium can physically produce — which is surely why Nolan’s team went to the trouble of making an S-220 version at all.
Playing the F-220 version on a fixed-height screen works, but it wastes the room. The Flat container is already side-masked down on such a screen, and the letterboxed 2.20:1 picture inside it ends up noticeably smaller than the S-220 presentation of the same film. If the house has physical masking, the standard Flat preset at least gives clean, even side masking with the letterbox inside it. Without physical masking, the picture is double-boxed — digital black at the sides and letterbox bars above and below — and the unmasked black regions cost contrast, invite stray light from the screen edges, and generally look less professional.
Making 2.20:1 look intentional: presets and masking
DCI and SMPTE only require a cinema to support masking for the two standard formats, Flat and Scope. But better-equipped houses go further and support intermediate ratios — 2.20:1, 2.00:1, 1.90:1, or the 1.37:1 Academy ratio — and for a film like Oppenheimer on a fixed-height screen, that extra effort is what turns a good presentation into a perfect one.
The projector side comes first. Rather than playing S-220 with the plain Scope preset, create a dedicated 2.20:1 preset. On Christie projectors the procedure is: start from the standard Scope preset, create a new custom screen file, adjust the digital side masking parameters until the digital edges align with where the physical masking will sit, and save the result as a dedicated 2.20:1 preset. Keep the adjustments symmetrical, test the alignment before a public screening, and document the settings once they are right so the work survives the next lamp change or firmware update.
Then the physical masking. Matching the fabric masking exactly to the 2.20:1 picture edge is what eliminates stray light and gives the image its full perceived contrast. Modern masking systems can simply have a dedicated 2.20:1 position installed and called from the automation. Older systems that only travel between the Flat and Scope positions can still get there: start the masking from the Scope preset and create a timed stop at the 2.20:1 position, implemented as a multi-step macro or playlist cue with the travel time measured out. It sounds like a hack, and it is one, but a well-calibrated timed stop is indistinguishable from a factory preset from the auditorium.
The verification tool for all of this is the S-220 framing chart that was distributed with Oppenheimer. Project the chart, check all four corners, and confirm the borders are even. The two photos below show why this matters: the first is a fixed-height auditorium with a slightly tilted projector, where the standard Scope preset leaves uneven side margins and the physical masking misses the image edges. The second is the same screen after building a custom S-220 preset with calibrated digital masking and adjusted physical side masking — even margins, symmetrical masking, and a presentation that looks like the format was native to the room.


Try it yourself: the aspect ratio tool
To see how any aspect ratio sits in the two containers, I have made a free aspect ratio tool at tools.dcpformat.net/aspect/. Pick a preset ratio or type your own, and it draws the picture inside both the Flat and the Scope container, with the exact active pixel area, the bar sizes, the share of the container’s pixels the picture actually uses, and the DCNC codes for each delivery choice. The numbers earlier in this post come straight from it. The tool runs entirely in the browser with nothing to install, and you can link directly into a ratio: tools.dcpformat.net/aspect/?ratio=2.20 opens it on Oppenheimer’s 2.20:1, showing the F-220/S-220 trade-off this whole post is about.