Working with subtitles in DaVinci Resolve
There are two common ways to work with subtitles in Resolve. The first is to export them as a separate subtitle file — SRT or TTML — that carries the text and the timecodes. Separate subtitle files can be switched on and off at playback, they are what streaming platforms expect, and they are what a DCP needs when the subtitles are delivered as their own track rather than baked into the picture. The second way is to burn the subtitles into the video image itself. Burned-in subtitles cannot be turned off, but they are rendered exactly as you designed them on every player, which makes them the safe choice for social media, for older playback systems, and for deliveries where you must guarantee that the text shows up.
Most projects end up needing both, and this post covers the whole round trip: exporting clean SRT files from Resolve, working around the line-break bug in the SRT export, importing an SRT in sync, and restyling Resolve’s default subtitles to DCP-style formatting before burning them in.
Exporting the subtitles as SRT or TTML
File – Export – Subtitle…

SRT is the format with the widest reach. VLC plays SRT files with the formatting tags intact, including italics and bold. YouTube and Vimeo accept SRT too, but their support for the formatting tags varies — check the list of subtitle formats and tags YouTube supports if the tags matter for your delivery. TTML (Timed Text Markup Language) is the richer alternative, with broader styling options, and it is the preferred format at the major streaming services like Netflix, Amazon Prime and Apple TV+. When choosing between the two, let the target platform’s subtitle specification decide.
The line-break problem in Resolve’s SRT export
Resolve automatically breaks long subtitle lines based on the “Max characters” setting in Project Settings – Subtitles. If the limit is 50 characters, any longer line is wrapped in the subtitle track and looks right in the timeline. But when you export to SRT, those automatic breaks are not written into the file — the exported subtitle comes out as one long line again. The TTML export does not have this problem: it keeps the breaks Resolve inserted. I have just retested this in Resolve 21, and the SRT export still drops the breaks.
There are three ways around it:
The elegant one is to export the subtitles as TTML first, reimport that TTML into Resolve, and then export as SRT — the breaks survive the round trip. Credit for this trick goes to Tam Le.
The second is to export as TTML and convert it to SRT in Subtitle Edit, the free open-source subtitle editor, which preserves the line breaks in the conversion.
The third is to not rely on the automatic wrapping at all: insert the line breaks manually in the subtitle text in Resolve, and the SRT exports correctly.
While you are checking the exported file, also look at the durations. Subtitles need to stay on screen long enough to be read — at least a second, and the SMPTE recommendation for cinema subtitles is a minimum of 15 frames with a small gap before the next subtitle. Subtitles that flash by too fast are one of the most common notes from quality control.
Converting DCP subtitles (SMPTE MXF or XML, Interop XML) to SRT
When the subtitles arrive as a cinema format — an SMPTE subtitle MXF, an SMPTE 428-7 XML or an Interop CineCanvas XML — and you need them as SRT for streaming or home media, Subtitle Edit handles the conversion while keeping the timing and the italics. It also lets you adjust timing and fix formatting afterwards, which is often needed when repurposing cinema subtitles for other channels. I have written more about working with Subtitle Edit here. For the opposite direction — turning a finished SRT into a DCP-ready SMPTE XML without installing anything — there is my free browser tool at tools.dcpformat.net/srt-convert/, and tools.dcpformat.net/subtitle-check/ checks the result against the cinema subtitle rules.
Burning in the subtitles
When creating final deliverables — a DCP or ProRes/H.264/H.265 files — I sometimes burn the subtitles directly into the picture. Burned-in subtitles keep every formatting decision exactly as designed: the italics, the font, the position, on every playback platform.
Distributors and festivals, on the other hand, usually require DCPs with a separate subtitle track rather than burned-in text. Separate subtitles make language versioning easy — a new language or a last-minute text correction becomes a small supplemental package instead of a full re-render of the DCP. So the best practice is to keep both options open: one version with burned-in subtitles for the deliveries that demand it, and one with separate subtitle files for distribution flexibility.
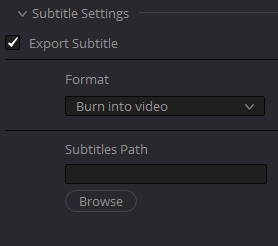
Choosing “Burn into video” when exporting
On the Deliver page, enable “Export Subtitle” and choose Format: Burn into video.
Importing and synchronizing the SRT file
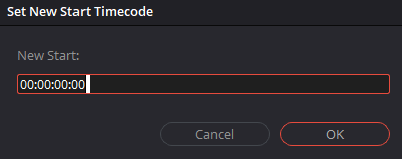
Drag the SRT file into the Media Pool. If the SRT timecodes count from zero, set the timeline to match: right-click the timeline, choose Timelines – Starting Timecode, and set it to 00:00:00:00.
Then right-click the SRT file in the Media Pool and choose “Insert selected subtitles to timeline using timecode” — every subtitle lands on its embedded timecode.
The alternative is manual placement: drag the SRT file directly to the point in the timeline where the first subtitle should start. That is the practical route when the timeline does not start at zero or the subtitles were timed against a different start point. Either way, scrub through a few dialogue scenes afterwards and verify that the text is in sync before going further.
Resolve’s default subtitle style vs. DCP style
Resolve’s default subtitle look is made for offline viewing, not for cinema: Open Sans in bold or semi-bold at size 58, anchored to the middle of the frame.
DCP subtitles look different. The convention is a plain sans-serif font — typically Arial — in white, with a drop shadow (or an outline) for legibility, bottom-anchored and center-aligned, and kept at least 8 percent of the frame height away from the bottom edge. The standard font size in the SMPTE subtitle XML is 42, and film festivals often specify 38–42 in their delivery requirements.
The XML sizes do not map one-to-one to Resolve’s font sizes, because the size is relative to the frame. As a rule of thumb: Arial at size 50 in a 1920×1080 timeline matches XML size 38 in a Flat DCP (1998×1080) and XML size 42 in a Scope DCP (2048×858). Keep that conversion in mind when the goal is a burned-in version that looks the same as the DCP’s subtitle track.
Change to DCP-style formatting
In the Edit page timeline, select all the subtitle clips — drag over them with the mouse or press Ctrl/Cmd+A. Then set the style in Inspector – Track:
Font: Arial Regular or Arial Nova Regular. Size: 50 (adjust to 42–50 depending on the delivery specification and the conversion rule above).
Stroke: black, size 1–2, on the outside of the letters. This is the same look as a DCP subtitle border, which also draws the black on the outside of the white text. Use it together with the drop shadow, or on its own, to keep the text readable over bright imagery.
Drop shadow: Offset X 2.5, Y −2.5, Blur 4, Opacity 92.
Alignment: Center. Anchor: bottom-center. Transform Y: 80 — that places the text about 8 percent up from the bottom edge in a 1920×1080 timeline.
The italics from the SRT file survive all of this: the track style sets the font, size, position and shadow, while the <i> tags keep marking the italic words. Play through the subtitled scenes and check the result before the final render — especially the italics, the line breaks and the bottom margin.