Why it is important to have an LCR or 5.1 mix for cinema
When it comes to cinema audio, the way dialogue is presented can greatly impact the audience’s experience. In a traditional stereo mix, dialogue is split between the left and right channels. This means that where you sit in the theater affects how you hear the dialogue – it’ll sound louder from whichever of left and right speaker that is closer to you.
On the other hand, a 5.1 surround sound mix places dialogue in the center channel. This ensures that no matter where you’re seated, the dialogue always seems to come from the center of the screen. To create a more uniform listening experience for everyone in the audience, it’s often recommended to upmix stereo films to either 5.1 or LCR (Left-Center-Right) format.
Some cinema sound systems can automatically upmix stereo audio to 5.1 using technologies like ProLogic. However, this isn’t a universal feature. When doing the upmixing yourself, you have the choice between LCR and 5.1 formats. LCR is a safer choice. It only uses three channels (left, center, and right), avoiding potential issues that might arise with the surround speakers or subwoofer in a full 5.1 setup. But full 5.1 upmixing can have good results in properly calibrated cinemas.
Ultimately, the goal is to ensure that every audience member enjoys clear, well-positioned dialogue, regardless of where they’re sitting in the theater.
Using DTS neural upmix and Penteo 16 pro plugins in Resolve
You can upmix stereo to 5.1 using the Fairlight DAW in Blackmagic Davinci Resolve and a 5.1 upmixing plugin.
I have tested the Penteo 16 pro ($499)/ Penteo 360 ($299) and Waves DTS neural UpMix ($249) stereo to 5.1 plugins.
Both plugins can:
- upmix stereo to 5.1 and 7.1.
- downmix to stereo from 5.1 and 7.1.
- upmix from 5.1 to 7.1
- downmix from 7.1 to 5.1
DTS neural upmix
- Analyzes phase and intensity to make a 5.1 mix. Can be overridden by the depth and width sliders.
- Is not officially supported in Resolve, but worked when I tested it.
Penteo 16 pro

- Is officially supported in Resolve by Penteo
- Uses a phaseless upmix.
Note:
For more info on upmixing read this post on how to upmix in Pro Tools.
Upmixing from stereo to 5.1 in Resolve
Add a stereo video or audio file to the timeline.
In the Edit module, add a stereo track to the timeline.

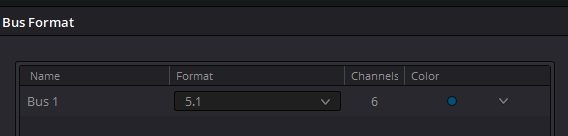
Choose 5.1 Bus Format
Go to Meny – Fairlight – Bus Format.
Choose Format = 5.1 and click on OK.
Add an upmixing plugin to the 5.1 bus in the Fairlight module
Go to the Fairlight module

Click on Effects and drag DTS neural Upmix Stereo/5.1 or Penteo to “Bus 1”.

Configure the plugin settings and test it.
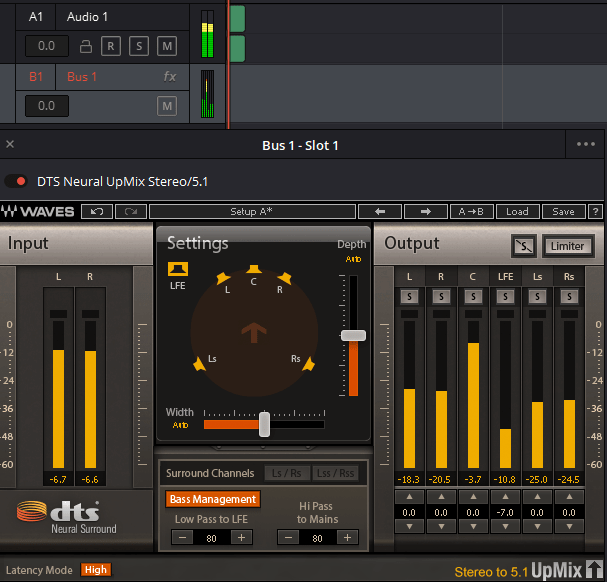
DTS neural upmix
I use a standard 5.1 upmix with lower LFE that I found to work for most content in the calibrated auditorium I use.
I lower the LFE by -7 and test the 5.1 upmix with “play”.
In the plugin, you can see the upmixed result
In the inspector (top right corner) you can also change the settings and remove the plugin with trashbin.
Note:
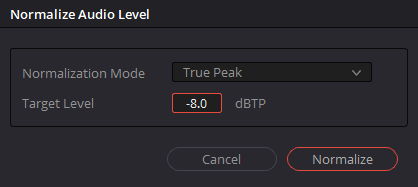
If the sound is clipping or too low, you can adjust the level with “Normalize audio level.”
Right-click the audio and use “Normalize Audio level”
Normalization Mode True peak
to a setting that does not clip like -8.
In DTS neural upmix you can also enable the limiter to avoid clipping.
You can adjust the loudness level for feature, trailer, or commercial levels. Read more about normalizing audio in this post.
If you want to run a limiter on the bus after the upmix plugin , you can add the built-in limiter to the bus after the upmixing plugin.
Note:
If you want an LCR upmix you could turn off the bass management and drag the depth slider to the front.
Penteo 16 Pro
After dragging the plugin to the bus, I click on the settings icon and change input and output order to L, R, C, LFE, lss, Rss, Lsr, Rsr,. This way, you will get audio files in the correct order like this:
1=L
2=R
3=C
4=LFE
5=LS
6=RS
In Penteo I choose discrete (hard center) and lower LFE by -7 (The default setting in Penteo is music, it has a wider sound with more phantom center sound.) The discrete 5.1 sound is similar to the default DTS neural upmix settings. This setting keeps dialogue in the center channel. The upmixing algorithm in Penteo is different so they do not match completely.
Exporting the 5.1 audio files
Go to deliver module.
When exporting sound files
Video options
Untick Export Video, if you are exporting only sound
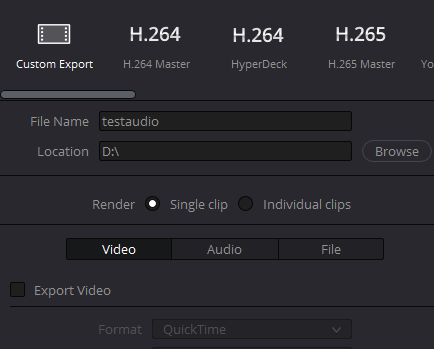
Audio settings.
Export Audio is ticked. Export 32-bit float
Format: Wave
Codec: IEEE Float
Sample rate: 48000
Bit Depth= 32
Tick “Render one track per channel.”
Tick “Render as discrete audio Track.”
Output Track 1 = Bus 1 (5.1)

Click on “Add to render queue and “Render all”
The audio files will have this order
1=L
2=R
3=C
4=LFE
5=LS
6=RS
Optionally you can change the names from Test_A01.wav to Test.L.wav and so on.
To use these mono files in Resolve in a 5.1 DCP you can add them as mono tracks
What is the best method for making a DCP of an old film which has only a mono mix available?
You can use the mono sound in the center channel. Often video files has the mono sound as a stereo track. When you play the video file the two stereo tracks will be identical. You may have to increase the sound in one the stereo channels to use it. The upmixing plug-ins will place almost all sound in the center channel if you UpMix a mono soundtrack placed in a stereo soundtrack. If you enable LFE, you might get some LFE in the LFE track.
Thank you for the response. That all confirms what I was thinking. Now a related question.
Do you have any experience of listening to a mono mix that an audio mixer has use any of the “stereoizer” tools to create something with some stereo width in a theater environment? I am wondering if that is a bad idea from a pure technical standpoint.
Thank you,
Jef
I think most films with a mono sound track are converted to DCPs with the mono track in the center channel to keep the original sound true to the original. Using a stereoizer on mono films could make the sound track sound different, especially if dialogue is also in the left and right channel. The left and right channel may not be matched with the center channel, so it best to have the dialogue in only the center channel.
Hi Kunut,
We do often have this problem, that we have a film made for TV in stereo and then are looking for a cheap but good sounding solutions to make a 5.1 DCP for some cinema views.
I am aware of the problem concerning the voices not beeing in the center, but never really tested it, because I do not have a 5.1. setup in my studio.
By any chance you have some links to movies you converted this way. Is it really worth the money to pay one of this plugins?
Thanks for your quick answer.
Best regards from Switzerland
Dan
Hi. Yes, I recommend using one of these plugins if you make DCPs from stereo sources, I have used these on hundreds of short and feature films for film festivals were I check the films in the cinema auditorium after the conversion. I usually combine upmixing with checking the netflix loudness level and if the dialogue is close to netflix level there should not be a problem. A free LCR alternative is the builtin LCR upmixer in DCP-o-Matic.
But for a similar 5.1 upmix as Dolby surround Pro Logic upmix with LFE and surround, one of these plugins are needed. Older movies in stereo were mixed
using a Dolby surround encoder. Films not mixed in Dolby surround will not always work using a normal 5.1 upmix, then I use a LCR upmix.