Cinema subtitle tracks are not SRT files. Inside a DCP, the subtitles live as XML — the SMPTE ST 428-7 format in a modern SMPTE DCP, or the older CineCanvas “DCSubtitle” XML in an Interop DCP — together with the font the projector should render them with. But almost every editing tool and every subtitler hands you an SRT. So somewhere between the edit suite and the cinema, the SRT has to become XML, and it has to become the right XML: the validation tools at the distributors and the cinemas are strict about details as small as the timezone format in the issue date.
This post walks through the conversion in Subtitle Edit, the free open-source subtitle editor, explains the properties that matter and why, and covers the rules your XML must follow to pass DCP validation. If you just want the result without installing anything, I have built a free browser tool that does the whole conversion in one step: tools.dcpformat.net/srt-convert/ turns an SRT into a SMPTE 2014 XML with the same formatting conventions described below, and can apply the SMPTE timing recommendations automatically. The Subtitle Edit route is still worth knowing — it gives you full control over every property, and once you understand what the settings mean, you can fix anything by hand.
Subtitle Edit now runs natively on Mac and Linux
A word about the tool first, because this changed in 2026. Subtitle Edit 5.0 was rewritten on a cross-platform UI framework and now ships native builds for Windows, macOS and Linux. Mac users no longer need Parallels or a virtual machine — just install the .dmg. The macOS app is unsigned, so the first launch needs a right-click – Open instead of a double-click.
Subtitle Edit converts between a long list of subtitle formats — SRT, PAC, STL, TTML, DVD subtitles and many more. For most of them the recipe is simple: open the file, change the format in the toolbar, remove any formatting the target format does not need (Edit – Replace is handy for that), and save. The D-Cinema formats are more demanding, which is what the rest of this post is about.
Check and fix the subtitles before converting
The conversion is the easy part; subtitles that are out of sync or badly timed will be just as wrong in XML as they were in SRT. So before changing the format, load the video file alongside the subtitles in Subtitle Edit and play through a few dialogue scenes to confirm the text lands where it should.
If the subtitles were timed against a different frame rate than the DCP will use, convert them with Synchronization – Change frame rate. If the whole file is offset — timed from a different start point — use Adjust – Set start and offset the rest. And give the timing itself a pass: subtitles need a small gap between them to read as separate events, and Tools – Apply minimum gap between subtitles will enforce a 2-frame minimum automatically.
Reading speed matters too. Subtitles usually aim for a maximum of 17 characters per second, with around 12 as the comfortable optimum, and a minimum duration of about one second. Subtitle Edit flags violations once you set the limits under Options – Settings – General. The streaming services publish their own numbers — here is Amazon Prime’s specification for Danish as an example:

These fixes can also be done in the browser: tools.dcpformat.net/subtitle-tools/ offsets subtitles, re-bases them to a different frame rate and converts between SRT and VTT, and tools.dcpformat.net/conform/ applies the cinema timing rules (minimum durations, gaps, the 4-second first event we will meet below) to a whole file mechanically — it fixes what can be fixed and reports what cannot.
Converting the SRT to a SMPTE XML DCP subtitle file
Choose the D-cinema XML 2014 format
Open the SRT file in Subtitle Edit — italics formatting survives the conversion, so a properly tagged SRT keeps its italics all the way into the cinema. Then, in the toolbar, set the format to SMPTE 2014 and the encoding to UTF-8 with BOM. There is also a SMPTE 2010 option; use 2014. It is the revision the validation tools expect, and XML written as 2010 is a common reason for rejected subtitle files.

The D-cinema properties
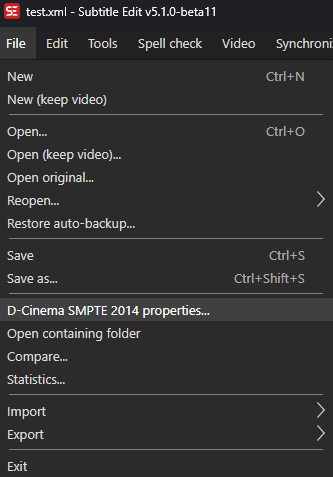
The XML metadata lives in a properties dialog: File – D-cinema Smpte 2014 properties.
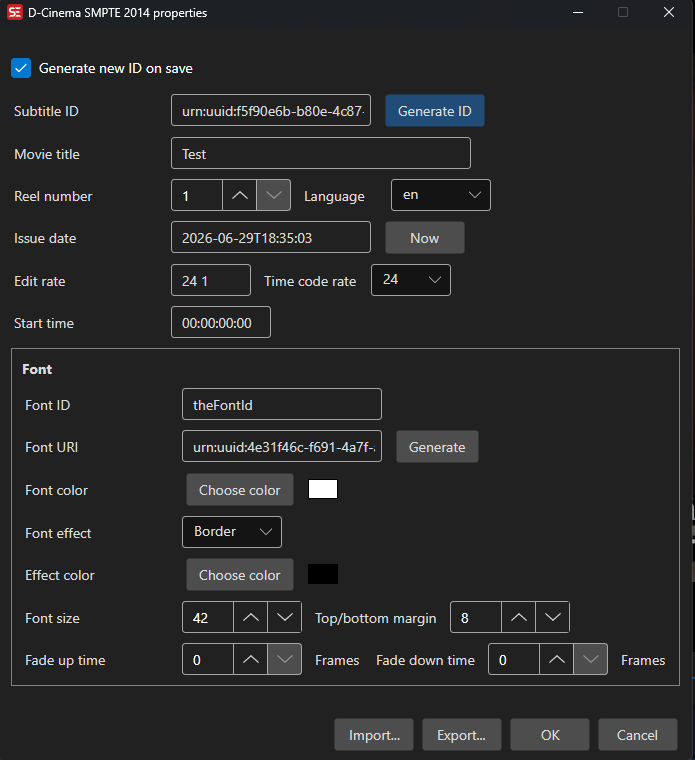
Fill in the movie title, and pay attention to the reel number: a multi-reel DCP needs one XML file per reel, each carrying the correct reel number. If you have a single timeline SRT for a multi-reel feature, it has to be split at the reel boundaries first, with each segment’s timecodes counted from the start of its own reel.
Two identifiers need to be generated fresh for every new subtitle file: click Generate ID next to the Subtitle ID, and Generate next to the font URI. These are UUIDs — the first identifies the subtitle document itself, the second is the name the font file will be loaded by. Never reuse UUIDs from an old file or from an example; every document needs its own.
Set the Edit Rate and Time Code Rate to the frame rate of the DCP. For a 25 fps SMPTE DCP, choose 25, and let Subtitle Edit do the conversion rather than editing rates by hand afterwards — the timecodes in the XML are frame-based (the last field counts frames, not milliseconds), so the rate and the timecodes must agree, and Subtitle Edit keeps them consistent when it writes the file.
For positioning and size: the bottom margin should be at least 8 (that keeps the text a safe distance from the edge of the picture; 10 is also common), and the standard font size is 42, festival delivery specifications sometimes ask for 38 to 42.
The font is delivered with the subtitles, and Arial.ttf is the normal choice. The size limit for a subtitle font in a DCP is 640 KB, and a 359 KB version of Arial.ttf is widely used. Here is the step people miss: rename the font file to the font URI UUID you just generated — no .ttf extension, just the bare UUID — and place it in the same folder as the XML. If the generated URI is 03048fd9-d51c-4050-bfbe-933320810bdd, the font file must be named exactly that. This is how the XML’s LoadFont element finds it, and it is why subtitles keep their look on every cinema server: the font travels with them.
The color is normally white, written as FFFFFFFF (the first pair is the alpha channel). Some productions use a slightly warmer white to match the white point of the graded picture. The default text effect in SMPTE 2014 is a drop shadow; a border (outline) is sometimes used instead. The effect color is black, FF000000. Leave the fade up/down times at 0 unless you have a specific reason.
Save the XML
<?xml version="1.0" encoding="UTF-8"?>
<SubtitleReel xmlns="http://www.smpte-ra.org/schemas/428-7/2014/DCST">
  <Id>urn:uuid:5fc5a0af-d2ba-4921-9047-27e509637387</Id>
  <ContentTitleText>title</ContentTitleText>
  <AnnotationText>This is a subtitle file</AnnotationText>
  <IssueDate>2024-04-08T15:45:43</IssueDate>
  <ReelNumber>1</ReelNumber>
  <Language>en</Language>
  <EditRate>24 1</EditRate>
  <TimeCodeRate>24</TimeCodeRate>
  <StartTime>00:00:00:00</StartTime>
  <LoadFont ID="Arial">urn:uuid:857176ec-629d-4a17-a000-9fa21ed8c5e5</LoadFont>
  <SubtitleList>
    <Font ID="Arial" Size="42" Weight="normal" Color="FFFFFFFF" Effect="shadow" EffectColor="FF000000">
      <Subtitle SpotNumber="1" FadeUpTime="00:00:00:00" FadeDownTime="00:00:00:00" TimeIn="00:00:01:00" TimeOut="00:00:03:00">
        <Text Vposition="14" Valign="bottom" Halign="center" Direction="ltr">-Test</Text>
        <Text Vposition="8" Valign="bottom" Halign="center" Direction="ltr">-Test</Text>
      </Subtitle>
    </Font>
  </SubtitleList>
</SubtitleReel>
Passing the DCP validation tools
Validation tools like Wailua and easyDCP check subtitle XML against the letter of the standards, and some of them are stricter than the standards themselves. A few details separate an XML that passes everywhere from one that gets bounced.
The namespace declaration must be the short form — <SubtitleReel xmlns="http://www.smpte-ra.org/schemas/428-7/2014/DCST"> — with no extra schema attributes; some validators only accept exactly this. The issue date should be written without a UTC timezone suffix, as plain 2021-10-17T09:25:42 — the example in ST 428-7:2014 itself uses a timezone, but some validation tools reject it. The start time must be 00:00:00:00. Each XML must carry the correct reel number for the reel it belongs to. And if any reel in the DCP has a subtitle track, every reel must have one — for a logo reel with no dialogue, use an XML containing a single blank subtitle rather than omitting the track.
The RDD 52 timing rules
RDD 52 is SMPTE’s “Bv2.1” application profile for DCPs, and its subtitle rules are what easyDCP and other tools enforce in their strictest mode. Three of them shape the timing of every subtitle file. Each subtitle must stay on screen for at least 15 frames, with at least 2 frames of gap before the next one — the minimum-gap tool mentioned earlier takes care of the gaps automatically. And the first subtitle in the first reel must not start before the 4-second mark; cinema servers need that lead time, and only the first reel is affected — later reels can start their subtitles immediately.
For line lengths, the recommendation is at most 52 characters per line, with 79 as the hard maximum and at most 3 lines per subtitle. Staying at 52 is the safe choice, and remember that the same font size occupies different proportions of different containers: size 42 on a 1.33:1 picture leaves you less room per line than size 40 on a 2.39:1 scope picture.
Rather than checking all of this by eye, drop the finished XML (or the SRT, before converting) on tools.dcpformat.net/subtitle-check/ — it runs every rule above, plus reading-speed and positioning checks, and there is a Netflix-style profile for streaming deliveries too. If it finds timing violations, tools.dcpformat.net/conform/ fixes them mechanically without touching the text.
Adding the XML to a DCP
To put the subtitles into a SMPTE DCP, give the mastering tool a folder containing the XML file and the UUID-named font. When the DCP is made, the two are wrapped together into a subtitle MXF track file. In an Interop DCP there is no MXF wrapping — the XML and the font are placed in a subfolder of the package as they are.
Interop properties
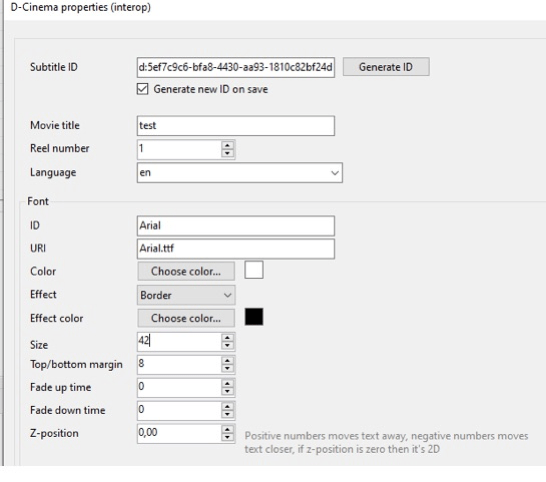
The Interop flavor of DCP subtitles is the older TI CineCanvas format, and its properties dialog in Subtitle Edit is close to the SMPTE one. The differences: there is no Edit Rate or Time Code Rate (Interop subtitle timecodes end in 1/250-second ticks rather than frames), and the font URI is usually just Arial.ttf rather than a UUID.
<?xml version="1.0" encoding="UTF-8"?>
<DCSubtitle Version="1.0">
  <SubtitleID>efdcb1d6-82bb-4399-b3c0-65b81323687d</SubtitleID>
  <MovieTitle>title</MovieTitle>
  <ReelNumber>1</ReelNumber>
  <Language>en</Language>
  <LoadFont URI="Arial.ttf" Id="Arial" />
    <Font Id="Arial" Color="FFFFFFFF" Effect="shadow" EffectColor="FF000000" Italic="no" Underlined="no" Script="normal" Size="42">
    <Subtitle SpotNumber="1" FadeUpTime="0" FadeDownTime="0" TimeIn="00:00:01:000" TimeOut="00:00:03:000">
      <Text VPosition="14" VAlign="bottom" HAlign="center" Direction="horizontal">-Test</Text>
      <Text VPosition="8" VAlign="bottom" HAlign="center" Direction="horizontal">-Test</Text>
    </Subtitle>
  </Font>
</DCSubtitle>
If you have inherited Interop subtitle XML from an old DCP and need it in SMPTE form — for a supplemental package against a modern master, say — tools.dcpformat.net/interop-convert/ converts CineCanvas XML to SMPTE 2014, translating the tick-based timecodes to frames and keeping the italics.
Editing the XML by hand
The XML is plain text, and some adjustments are quickest in a text editor like BBEdit (Mac) or Notepad++ (Windows).
Font size is one of them, because of a Subtitle Edit quirk: at size 42 with a bottom margin of 8, two-line subtitles sit on rows 8 and 14 — 6 percent of the picture height apart. Choose size 40 in the dialog instead and Subtitle Edit tightens the spacing to 5 percent, putting the lines on 8 and 13. If you want size 40 but the 8/14 spacing, save at 42 and then change Size="42" to Size="40" in the editor.
Vertical position is another. If a subtitle collides with a burned-in title, move it up by raising the Vposition values — a two-line subtitle at 14/8 becomes 26/20, for example, which lifts it well clear of the lower third. Note that Subtitle Edit resets these positions if you open and re-save the XML, so do positioning as the last step.
Text can also be shifted sideways with an Hposition attribute: a positive number moves it right, a negative number left.
<Text Vposition="8" Valign="bottom" Hposition="5" Halign="center" Direction="ltr">test</Text>
<Text Vposition="8" Valign="bottom" Hposition="-5" Halign="center" Direction="ltr">test</Text>
If editing coordinates by hand feels backwards, it is — which is why I built a visual editor for exactly this: tools.dcpformat.net/subtitle-editor/ loads a SMPTE subtitle XML, shows every subtitle on a Flat or Scope preview, and lets you drag it into position; the Vposition and Hposition values are written for you, and it validates durations and gaps while you work.
Testing the XML subtitles
Before the subtitles go into a real package, watch them. The DCP-o-matic player renders soft subtitles, so you can check the timing, position and italics against the picture, and easyDCP Plus can check subtitles as part of its validation pass. Between a visual check in one of those and a rules check at /subtitle-check/, a subtitle file that passes both is ready for the cinema.