SFTPGO can run SFTP with web client, FTP with TLS, and WebDAV, and you can easily configure virtual chrooted users via a web browser.
In this post, I set up SFTPGO SFTP on Ubuntu 20.10 on a Hetzner auction server with 14 TB of SFTP storage. This tutorial also works for other Ubuntu installations, just skip the part about installing Ubuntu 20.10 on a Hetzner server.
Update: I updated this server to Ubuntu 22.04 and reinstalled sftpgo with these commands:
Upgraded to 22.04
sudo do-release-upgrade
Reinstalled sftpgo
sudo apt install software-properties-common
sudo add-apt-repository ppa:sftpgo/sftpgo
sudo apt reinstall sftpgo
sudo systemctl status sftpgo
Activate the rescue system on the Hetzner Robot web page and install Ubuntu 20.10

You will now have a root password. When you reset the server with Reset – Send CTRL-ALT-DEL to the server you can log in and run installimage

Log in to the server running the rescue system
I use terminal on mac or Ubuntu on Windows
ssh root@1.1.1.1

Run installimage
installimage
Choose “install ubuntu 20.10 minimal”. Since it is not an LTS release you can easily add the SFTPGO PPA repository later.
The default settings for this 4 x 6 TB HDD server is RAID level 6 where two hard drives are redundant. 2 TB for / and almost all of the rest for /home is the default. I changed to RAID level 5 so only one hard drive is redundant and set 1080G for / and 1080G for /home and the rest in /srv (14TB) for SFTPGo to use.


Install Ubuntu by exiting the editor with F10 and finish the installer
Reboot the server
reboot

Log in to the server running Ubuntu 20.10
ssh root@1.1.1.1
Check storage with df -h
df -h
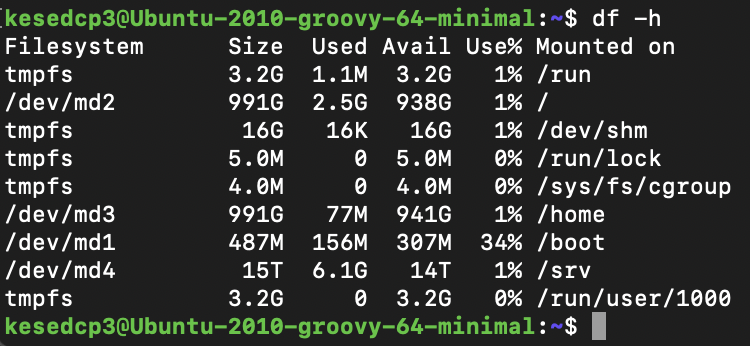
Add a sudoer user
It is recommended to use a normal user that is part of the sudo group instead of using root.
sudo adduser newuser
usermod -aG sudo newuser
Login in with the new sudo user
When you need to do something as root use sudo. Or su.
ssh newuser@1.1.1.1
Update Ubuntu
sudo apt update
sudo apt upgrade
Disable root ssh login and change ssh port (optional)
For security reasons it is common to change the default ssh port and disable root ssh login.
sudo apt install nano
sudo nano /etc/ssh/sshd_config
Comment # PermitRootLogin to disable root login.
Change the port to 2222

Restart the sshd service
sudo systemctl restart sshd.service
Log in with the new port number
ssh newuser@1.1.1.1 -p 2222
Change the firewall settings to open the SSH port, SFTPGO SFTP port and web admin UI port
I edited the /etc/nftables.conf to accept SSH/SFTP on port 2222, 2022, and HTTP on 8080.
sudo nano /etc/nftables.conf
I modify a simple nftables firewall ruleset for a server with this line
tcp dport { 2222, 2022, 8080 } accept
Restart nftables
sudo systemctl restart nftables
List the nftables ruleset
sudo nft list ruleset
Install SFTPGO
The easiest way to install SFTPGO is to add the SFTPGO PPA repository to Ubuntu 20.10. In 20.04 LTS it is not allowed by default to add PPA repositories.
sudo apt install software-properties-common
sudo add-apt-repository ppa:sftpgo/sftpgo
sudo apt install sftpgo
sudo systemctl status sftpgo
Open the SFTPGO web admin UI to the internet
Change the “httpd” “address”: “”127.0.0.1” to “httpd” “address”: “” in the sftpgo.json configuration file so you can access the web admin UI from the internet. You can also enable the built-in brute force defender if you change “defender” to “enabled”.
It is also possible to enable HTTPS SSL/TLS encryption using certbot, as I wrote about in this post.
sudo nano /etc/sftpgo/sftpgo.json


Restart sftpgo
sudo systemctl restart sftpgo
Change the default admin password
Login to the web admin interface with a web browser with the username “admin” and the password “password”.
Use the IP address of the server and port 8080. Like http://1.1.1.1:8080/web/admin/login

Change the default admin password in Admins.


Add a SFTPGO SFTP user
The minimum settings for a user are:
-username,
-password
-and permissions like all * or download only.
If the user is called user1 the default directory is /srv/sftpgo/data/user1. The user can only upload and download to this directory. User1 is not an actual user on the system and needs a home directory that the sftpgo user has access to like /srv. You can also choose to enable max connections, disk storage quota, max bandwidth, and more.


You can now connect to the SFTP server with Cyberduck or similar SFTP clients. I recommend using Cyberduck because it uses segmented downloads. .
Connect to the SFTPGO SFTP server using an SFTP client to upload or download
Choose SFTP, port 2022, username, and password.

Try uploading and downloading. I get 44 MB/sec uploading on a 500 mbit connection on a mac.

Connect to the Web Client to change credentials
Type in http://1.1.1.1:8080/web/client/login in a web browser
You can enable HTTPS SSL/TLS encryption using certbot on the web client, as I wrote about in this post.

See which users are connecting and downloading (optional)
When clicking on connections in the SFTPGO web admin UI you can see who are downloading or uploading.


Check CPU and memory usage on the server with htop (optional)
sudo apt install htop
htop
SFTPGO uses a litte more CPU than the Openssh SFTP server. The server seems to handle it well.
