When doing versioning on feature film DCPs you often add logo reels in front of the film.
Usually, these are:
- distributor logos
- film festivals logos
- sponsor logos
I wrote a post about adding logo reels to a DCP in Easydcp Creator here.
Logos are sent as pictures, video files, and sometimes DCPs.
Blackmagic Davinci Resolve can be used to scale and convert pictures to video files. Resolve can also be used to raise or lower the sound on video files and DCPs if you need to match sound levels between the logo reels and feature film.
Matching reel sound levels
Animated logos can have a louder sound level than the other logo reels and the feature film.
A -20 dB RMS pink noise is measured at 85 dBc at the fader reference level 0 in cinemas. ( RP:202:2012 SMPTE standard.)
Some films are mixed louder than others, cinemas test the films and find a fader level where normal dialogue is not too loud/low.
If an animated logo has loud parts that reach true peak +2 it can be loud compared to the feature film.
To avoid this problem, some cinemas insert an extra fader level macro that lowers the fader level before the animated logo in the playlist for that feature film,
and then use a second fader level macro that turns the sound up when the film starts.
DCPs with animated logos that sound OK at the same fader level as the feature film are preferred.
Adjusting the sound level on a video file or DCP in Fairlight in Resolve
To adjust the level on an animated DCP logo you can use Blackmagic Davinci Resolve.
See this post for more info on using Resolve to open and export DCPs.
After opening the DCP in Resolve, choose Fairlight
Right-click the audio
Choose Analyze audio levels
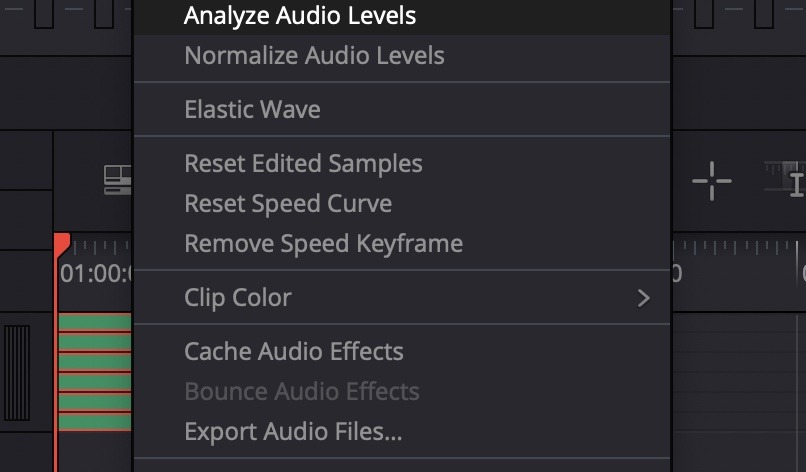
Choose a loudness standard like EBU R128 and choose analyze
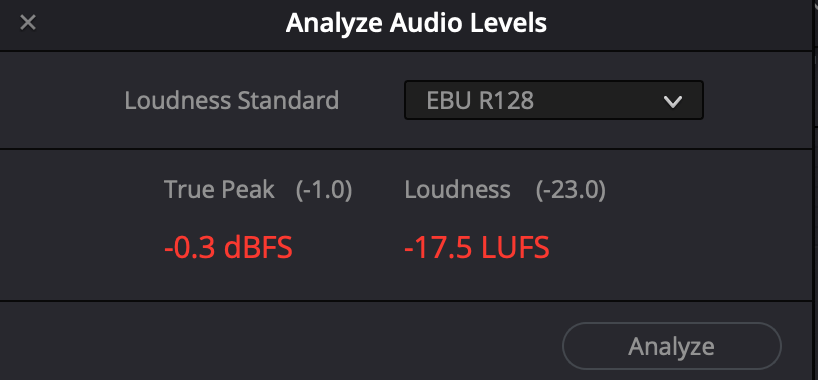
True peak is -0.3, and Loudness is -17.5,
If I want to lower this to True Peak -6 I can use Normalize Audio Levels.
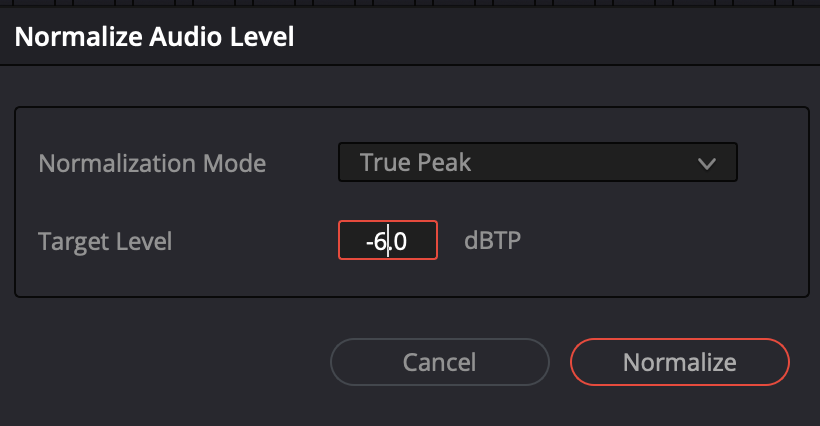
Close the Analyze Audio Levels and right-click the audio, and choose
Normalize Audio Levels
Normalization Mode = True Peak
Target Level = -6
and then click normalize
Now the DCP or video file can be exported with lower sound.
Use logos that fit the aspect ratio of the feature film or use letterboxed logos
If the film is Flat, use the Flat logo
If the film is Scope, use the Scope logo.
The logo should not be in the larger 1.85:1 format if the movie is letterboxed 2:1 or similar. Cinemas may have a custom preset that will crop the logo at 2:1. If the film is letterboxed flat 2:1 or 2.2:1 use the Scope logo in letterboxed Flat container instead of the Flat logo to avoid cropping the logos.
In Easydcp Creator you can choose Flat and the scale to fit.

See this post for more info on scaling Scope DCPs to fit in a Flat container.